How to Make a Waistband Adjustable
Share
There comes a season in one's life (at any age, really) when waistbands are more comfortable when they're adjustable.
There are two approaches to this! Liz Haywood shares how you can make a waistband to be adjustable by the wearer at any time, or you can build in adjustability so it's possible to alter the waistband with sewing later!
Here are four ideas:
1. Side tabs
This is a very easy idea, and provided you have fabric they can be retrofitted to any waistband. Kilts use side tabs with a buckle, but often trousers and shorts use a tab and button - sew a couple of buttons on to give options for how much smaller to make the waistband. Two D-rings or even ties could be used instead to adjust the tabs. Sometimes a single tab or ties are used at the centre back.

This ancient pair of Aussie Rules football shorts has two buttons and a tab on each side of the waistband.
2. Back waist elastic
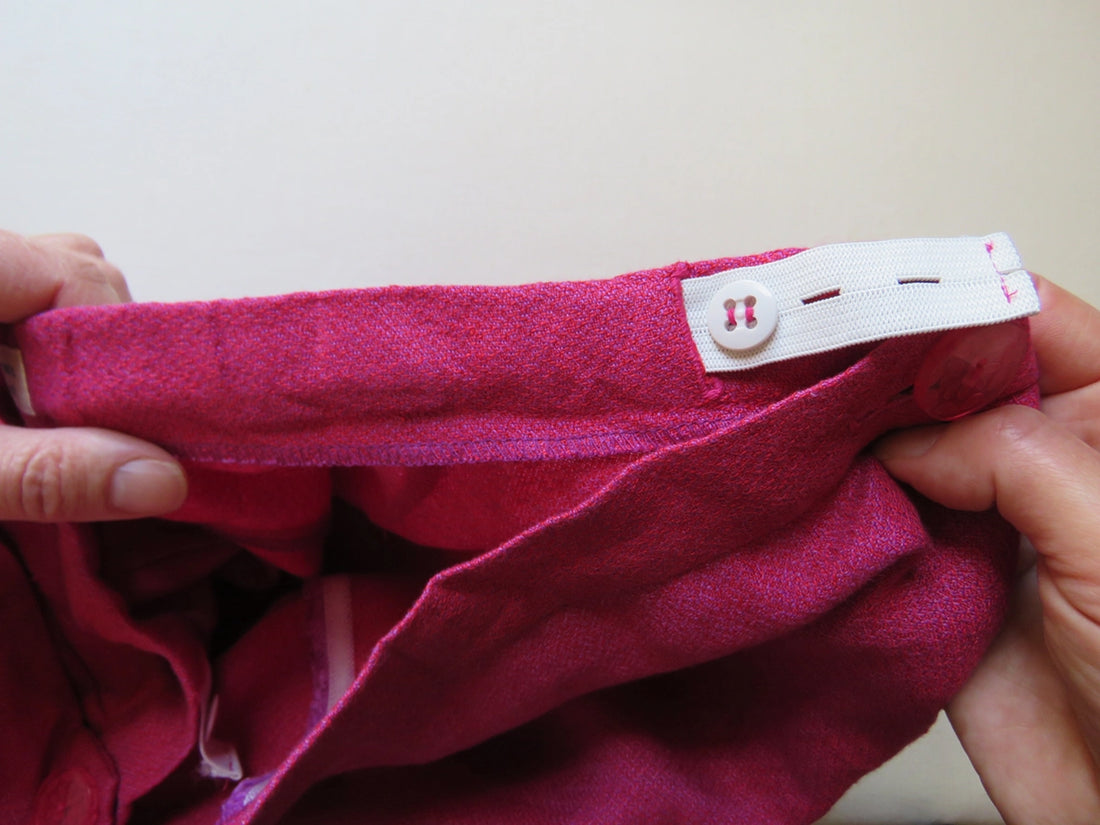
Like side tabs, this can also be retrofitted to a waistband, even on RTW clothes. Use buttonhole elastic (typically 2cm (¾in) wide). If you're retro-fitting, unpick a section of the waistband at each side. Make a buttonhole (about 2.5cm (1in) long) on the inside of each side of the waistband.
If necessary, place some fabric or fusing behind it to give it support when you sew it. Thread the buttonhole elastic through the back of the waistband and sew a button on each side. To stop the elastic fraying in the wash, fold under 6mm (¼in) at each end and stitch.

Back elastic, emerging through buttonholes, makes the waistband adjustable on this side-opening skirt. On maternity clothes, the elastic is put at the front instead of the back
3. Wide seam allowances
Can't ignore the obvious! If you are sewing a pair of trousers or a skirt, 'future proof' the waist by giving them wider side seams and/or centre back seam, so you have something to let out.

Wide seam allowances, thoughtfully added when the trousers were cut out, made it possible to make this waistband bigger later on. In my left hand you can see the section added into the centre back waistband (to be covered with a belt), and in my right had is the now-narrow side seam.

Men's trousers, showing the traditional wider centre back seam for adjustment. The waistband also has a centre back seam, and the back seam runs through waistband and trousers - the waist can be made bigger simply and quickly by letting out the seam.

4. Add a drawcord to an elastic waist.
If you think you'd like more adjustability than solely elastic can offer, consider adding a drawcord to the elastic channel. The drawcord ends can emerge on the inside or outside. Some elastics have drawcords already in them.

On the subject of elastic: good quality fabric will generally outlive elastic, so if you're planning an elastic waist, make it easy to replace the elastic later - leave a little gap to get to it, and don't stitch through the elastic.


